Showing posts with label mooncakes. Show all posts

Tuesday, 22 September 2015

Mooncakes Round 5 - 2015

Shanghai mooncakes, been wanting to try this recipe since last year.  I have some salted duck eggs in the fridge and a day without any activity.  Finally I managed to bake these and get it out from my to-do-list. :)

Shanghai Mooncakes with walnuts. Bon appétit!

The original recipe : 

I replaced the custard powder with cornflour. The pastry turns out flaky & not too bad. 
Used ready made paste, white lotus purchased from Kwong Cheong Thye, Singapore. 

Rub the butter into all the dried ingredients & added the wet ingredients to form a soft dough.
Separated the yolk from the white. Cleaned.  Coated with shoaxing cooking wine. Baked at 160 degree C for  15 mins or until cooked.  Cut each yolk into 4.
White lotus paste (about 28 grams) with melon seeds and wrapped a piece of yolk in the middle. Roll into a ball.

Chin's notes:
1. I used 24 - 28 grams of paste and 26 grams of dough, made about 28 pieces of golf ball size Shanghai mooncakes.
2. Make sure the duck yolks are fully cooked. May required more than 15 minutes. I covered with an aluminium foil to prevent drying out.  Steaming is an alternative to cook the yolk.
3. Did not use the machine as suggested by the recipe, used rub the butter into flour method.


Monday, 14 September 2015

Mooncakes Round 4 - 2015

Piglet mooncake biscuits, normally sold in a "cage".  Today they comes in different design, size and shapes.  I did not manage to get the little cages when I was in Singapore / Malaysia.

This little piglet, 5th day after baked.

I used the same traditional mooncake's recipe with alkaline water : Mooncakes Round 1 - 2015
They need to be aged for at least 3 days, the texture of the biscuit will be better after the oil is "released".
Just after baked from the oven. Glazed 2 times with egg wash.

Wooden piglet mould purchased in KL, Malaysia.

22 September 2015
Added eyes ( black beans) to the piglet.


Sunday, 13 September 2015

Mooncakes Round 3 - 2015

Tried making snow skin mooncakes (冰皮月饼) using recipe from Rasa Malaysia blog. It was easy & the texture was good.

Ready Red bean & green tea pastes purchased from Kwong Cheong Thye ( Singapore). 

Lychee with red bean

Lychee with red bean paste snowskin mooncakes: 

65g Cooked glutinous rice flour (gao fen).
70g icing sugar 
65ml lychee syrup from canned lychee
1 tbsp fresh milk
1 tbsp shortening 
Food colouring of choice (optional)
Red bean paste

Preparation steps: 
1. In a big bowl sift the cooked glutinous rice flour & icing sugar together. 
2. Rub shortening into the mixture until it resembles crumbs. 
3. Add the syrup, milk & colouring.
4. Form a dough and give a few good knead until texture is soft. (if too sticky add a bit of gao fen). Set aside for 10mins.
5. Weigh the red bean paste & shape into a ball. My red bean is 30g & dough is 26g. 
6. Flatten the dough & place the paste & seal it completely. Roll onto the gao fen & dust off the excess flour then shape it using the mooncake's mould. 
7. Keep in the airtight container in the fridge for at least 1hr before serving. Serve cold with tea!

Voilà! 

Mini snow skin mooncakes

Chin's notes: 
1. Original recipe from Rasa Malaysia Blog : http://rasamalaysia.com/snow-skin-mooncake/2/
2. Will add some lychee flavour in the future, because I can't taste the lychee. 
3. Reduced the sugar because lychee syrup is sweet. 
4.I halved the ingredients, made about 12 mini mooncakes. 
5. With green tea paste
Second batch - Green tea paste

Tuesday, 8 September 2015

Mooncakes Round 2 - 2015

My 2nd attempt on mooncakes this year & trying out my new moulds purchased from Kuala Lumpur & Singapore.

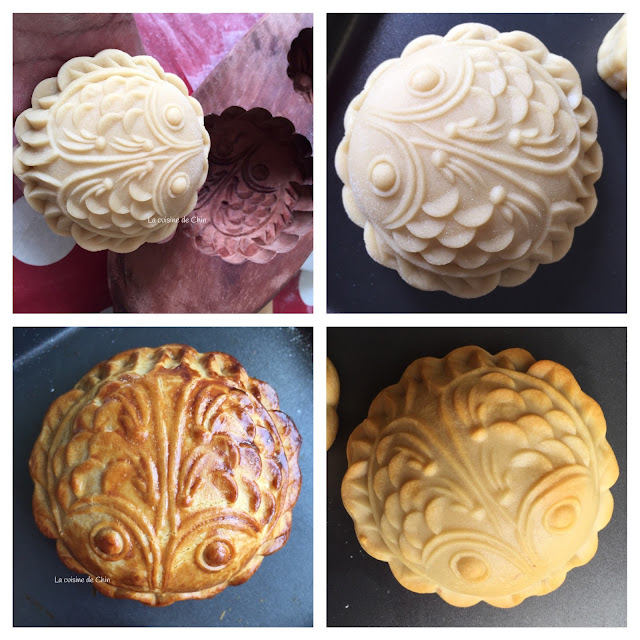
Fish mould purchased from KL, Malaysia

Flower mould purchased from Singapore.

This time, I used the same recipe with the used of alkaline/lye water as requested.  I'm pleased with this bake because the texture of the pastry is quite moist after they were aged.

Recipe from 

I attempted the moulding method that Andrew Lim suggested, where I floured the ready dough ( pastry + paste ). The printed on the moulded mooncakes is more profound. 

Rolled the ready dough ( pastry + paste ) on the flour.


Evenly coated with flour.


Different stages.

The aged mooncake after 3 days. : )

A view of the mooncake and it's paste after aged for 3 days.

Chin's notes: 
1. My previous bake : 
2. This time I did not floured the mould properly. The dough was stuck to the mould. I carefully removed the dough with a teaspoon and removed as much dough as possible.  Then I washed the mould with hot water & used a brush to clean off the stuck dough. 

Thursday, 3 September 2015

Mooncakes Round 1 - 2015

Finally I managed to try to bake some traditional mooncakes this year.  Been wanting to try making some mooncakes since last year but did not get a chance because I do not have the tools with me.  Thanks to Andrew Lim, who helped me get some moulds from Singapore & I bought a few more when I was in KL. ;)

Mooncakes ready for the oven.

My weights ratio between the filling & dough is about 2:1. Eg 30g of filling & 20g of dough. If lesser dough was used I find that the mooncake's skin is too thin. 


Shaping of the mooncakes. I used plastic sheets to flatten the dough. 


Remember to dust your mould with flour before you mould your mooncake each time!  Otherwise the dough will stick to the mould & will be difficult to remove. 


After baked and after 2 applications of egg wash.

I couldn't find Lye / Alkaline water & my aunt suggested to put baking soda with the flour instead. I tried some bakes with baking soda added and some without baking soda.

There is a difference if Lye / Alkaline water is used in the dough. It helps to gives the mooncake's dough the colour & the texture is slightly softer / smoother.

Here are my mooncakes after they were aged for 3 days. 

Dough without baking soda added.

Dough with baking soda added.

Recipe from 

Chin's notes: 
1. I cannot find Lye / Alkaline water, hence I used baking soda instead. 1/4 tsp of baking soda were added.
2. I rested my dough at room temperature for 12 hours before moulding the mooncakes. 
3. Weight for each mooncakes is about 2:1 ratio. For mini mooncakes I used 30g of filling & 20g of dough. 
4. Ready mooncakes fillings were purchased from Kwong Cheong Thye. They were just perfect , not too sweet & very smooth the texture! 


Thursday, 30 July 2015

Golden Syrup

An important ingredient needed to make moon cake. This year I am going to try to make traditional moon cakes after I received my moulds!!!


Golden syrup cannot be used immediately it needs to be aged for at least 2 weeks.

I managed to prepare a batch just before I leave for my vacation & when I returned, it will be ready! :) 

Colours transition from initial to end. About 45 minutes process. 

Here is a simple recipe from Asian Delights - All Time Favourite Recipes by Betty Yew, one of my oldest recipe book ;) 

Ingredients: 
600g sugar 
1 & 3/4 cup of water 
Lemon juice from 1/2 of a large lemon 

Preparation steps:
1. Put all the ingredients in a pot & bring to boil. 
2. Switch the heat to med-low & slow bubbles until the mixture turned golden in colour. 
3. Turn off the heat & leave to cool. Transfer to a bottle for storage.
4. Set aside for at least 2 weeks before use. 

Voilà! 

Chin's notes: 
1. Don't forget to label the date on your bottle.