Showing posts with label Asian. Show all posts

Tuesday, 12 July 2016

Rice Noodles with Fish Sauce


Was at a friend's house for a BBQ last summer in Singapore. Her mother-in-law prepared a very yummy fried rice noodles & when I asked her what is her secret. She shared the use of fish sauce & minced pork! Simple yet tasty. 

Ingredients : 
100g minced pork - lightly seasoned with some pepper & salt. Set aside. 
1 packet of rice noodles 
1 packet of bean sprouts / bok choi 
3 cloves of garlic - minced 
1 carrot , thinly sliced. 
Oil 
Fish sauce & pepper to taste

Preparation steps: 
1. Put the rice noodles in the large bowl & pour boiling water over it. Set aside until the noodles turned soft. Drain & set aside. 
2. In a wok, add add 3 tbsp of oil. Heat up & add 1/2 of the minced garlic. Fried until fragrant & add the minced pork. Stir fry until all the meat is completely cooked. Add in the rice noodles.
3. Add the fish sauce and some pepper. Mix well and fry a little until noodles are completely cooked. Dish out into a pot / rice cooker to keep warm. 
4. Clean the wok & heat up some oil, add the remaining garlic & fry until fragrant & add the carrots & desire vegetables. Fry a little & don't over cooked the vegetables. Season with some fish sauce & pepper. 
5. Dish out & spread over the rice noodles. 

Voilà  & serve warm! 

Chin's notes:
1. Fish sauce is slightly salty, taste your noodles as you are adding the seasoning. 
2. Can served with fried omelettes as garnishing. 


Monday, 4 May 2015

Pandan Kaya Cake

I have a mission to make this cake for a special celebration in Paris.  I have never baked this cake before & I'm determine to give it try with the following recipe from Kitchen Tigress. 


My first attempt & I made some minor adjustment to the recipe because I do not have some of the ingredients & they turned out great! At least they taste yummy to the family ( my tasters ;) !! & the sweetness is just right! :p

This is a cake with a layer of "jelly" / custard garnishing with coconut flavour.

Pandan Kaya Cake adapted from Kitchen Tigress

For the cake recipe : 
Ingredients - 
4 egg whites ( from medium size eggs) 
40g sugar 
1/2 tsp cream of tartar 
B
10g sugar 
3 egg yolks ( from medium size eggs ) 
50g corn oil / vegetable oil
45g coconut milk
1/2 tsp baking powder 
50g plain flour - sifted 
1 tbsp pandan extract

Preparation steps:
1. Line the baking tray with baking paper. 
2. Put all the A ingredients into the mixing bowl & whisk until the egg whites stif peak. 
3. In a separate bowl, mix all the B ingredients until they are well combined. 
4. Gently fold A into B in 3 portions until they are well combined. Do not over fold.
5. Transfer mixture into a lined baking tray & bake in a preheated oven at 160 degree C for 40 minutes or until the cake is cooked. Test with toothpick, they should come out clean when cake is cooked. Meanwhile, prepare the kaya / jam while waiting for the cake. 
6. When the cake is ready, remove from oven & leave the cake to cool on a cooling rack. 

For the kaya ( jam ) recipe
Ingredients -
C
340g of water + 1 tsp pandan extract
1/2 tsp of white agar agar powder
40g sugar 
25g of butter (I used salted butter) 
A pinch of salt (very little to bring the flavour out)
D
120g coconut milk
35g corn flour 
1/2 tsp pandan extract 
Few drops of yellow colouring ( or more to get the desire green colour) 

Kaya / Jam 

Preparation steps : 
1. While the cake is in the oven baking. Mix all the C ingredients into a cooking pot (thick/heavy base pot is preferred). Stir until all the sugar dissolved. Set aside for 30 mins / more. 
2. In a separate bowl, mix all the D ingredients until they are well combined. 
3. Only start to cook the kaya / jam only when the cake is competely cooled! 
4. Heat up the pot with C mixture on a medium heat. Do not bring to boil. Just warm enough to melt the butter.  Once the butter has melted. Turn off the heat & remove from heat. 
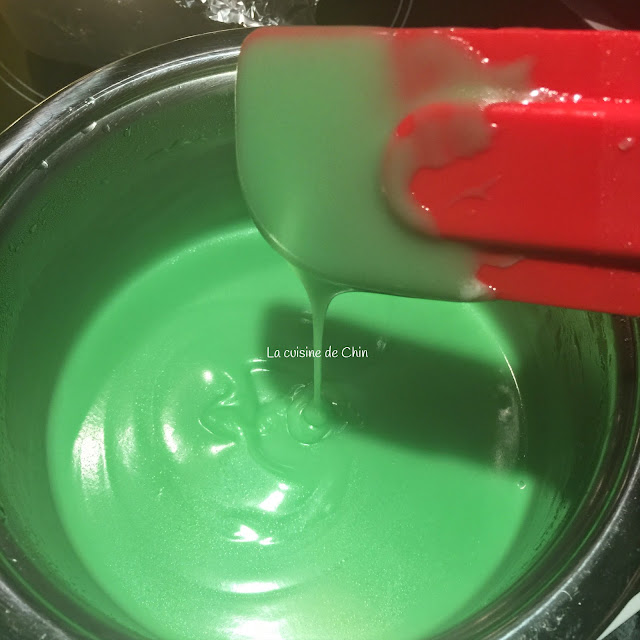
5. Stir in D mixture into C, once is well combined, turn on the heat to low - medium heat & cook the mixture until it is smooth & thicken. Stir constantly. Add more drops of yellow colouring if the mixture is too green. Add yellow colouring until the desire colour is achieved. 
6. Once mixture is thicken (when they coat the side of the pot). Turn off the heat & set aside to cool down a little. Just a few minutes.

To assemble the cake: 
Cake assemble process
1. You'll need a container / pan to put  the cake & kaya together. I lined the container/pan with aluminum foil. 
2. Cut the cake into the desire shape. I just halved my square cake to get 2 rectangle cakes. 
3. Place the bottom layer cake in the prepared container / pan. Then pour the kaya over the cake. Slowly swirl to get a layer of kaya coated evenly on the cake. 
4. Then wait for the kaya to set a little. I put into the fridge for 1 min to let the kaya set. 
5. Place the other half of the cake on the kaya. With the top facing the kaya, so I will get an even top for the finished cake. Then pour the kaya over the cake, swirl to get a smooth & even top.
6. Leave it in the fridge until the kaya is completely set. I left it overnight in the fridge. 
7. When the kaya is set, unmould & trim off the edges. Cut the cake into serving bite sizes & serve them cold. 

Trim off the sides

Voilà & bon appétit! 

Chin's notes
1. Here is the link to the original recipe: 
http://kitchentigress.blogspot.sg/2014/06/pandan-kaya-cake-video-recipe.html?m=1
2. The ingredients were quite small, I'll double them in my next bake! Only managed to get 2 layers of cake instead of 3. My final cake is about 5.5"x8.5" cake.
3. Take note of the sequence in the preparation. 
4. Kaya consistency can be tricky. I cooked until I can see the obvious stirring trails when I stir the mixture. 

Sunday, 26 April 2015

Pickled Cucumbers


Joanne Lee, from SHC shared her wonderful recipe. Thank you!! They are really yummy. 

I made some adjustment to the recipe as I like them more sourish & sweet. 

Pickled Cucumber Recipe 
Ingredients 
1 large cucumber
1 tsp salt

Seasoning 
3 tbsp white vinegar 
1 tbsp sugar
2 bird eye chili / chili padi - thinly sliced
1 tsp sesame oil 
Toasted sesame seeds

Preparation steps: 
1. Clean the cucumber, halve & remove the seeds. Slice the cucumber about 1cm thick or thinner.  Put them into a large bowl. Evenly coat with salt. Leave for about 10 mins. Then drain the water accumulated. 
2. Add in all the seasoning, mix well & keep in the fridge for at least 30 mins. Mix again before serving. Serve cold. 

Voilà ! 

Chin's notes: 
1. I garnished with extra sesame seeds before serving. 
2. Do not wash the cucumber after they were seasoned with salt. If washed the cucumber will not be crunchy. Salt is to remove the excess water in the cucumber. 

Saturday, 25 April 2015

Chiffon Cupcakes Again


I'm very pleased with my bake today. :) Tried the following method and it seems to give me a nicer chiffon cupcakes after they have completely cooled. 

Fill the cake mixture to about slightly more than half full in the baking liners.
Baked at 165 degree C for 20 mins then lower oven temperature to 160 degree C for another 25 mins. 

After 4hrs, the cupcakes still looks good. 


Pandan Chiffon Cake recipe: 
Ingredients 
6 egg whites 
80g sugar 
1/2 tsp cream of tartar 

6 egg yolks 
100g sugar 
100g plain flour 
1 tbsp pandan extract 
1/4 cup / 50g coconut milk 
1/4 cup / 50g vegetable oil 

Preparation steps: 
1. Whisk ingredients for A until stiff peak. 
2. In a separate bowl, mix well all the ingredients  for B. 
3. Gently fold mixture A into B. 
4. Transfer mixture to muffin tray lay baking liners. Fill to slightly more that 1/2 full. 
5. Bake on the lowest rack in a preheated oven at 165 degree C for 20 mins then 160 degree C for another 25mins. 
6. Remove from oven, & leave cupcakes to cool upside down on cooking rack. 

Voilá! 
Chin's notes: 
1. This is the same recipe that I used for the normal chiffon baked in the chiffon pan. 
2. For normal chiffon bake, bake for 55 mins to get the lovely crust on the side. Turn baking tin upside down for cooling. Remove cake from baking tin. Slice the cake into serving portion before serving. 
3. Other chiffon bakes 
4. These were baked in March 2015. 
I did not get the nice dome then. 

5. Added on 26 April 2015 - baked more cupcakes by halving the ingredients. I managed to get 17 cupcakes. I also got the same results with nice dome & they stays nice. 
Middle & bottom racks were used for these bakes. 


Wednesday, 22 April 2015

Fried Rice Noodles


Fried rice noodles ( char bee hoon ) for today's lunch. Someone mentioned that anything cooked with Thai fish sauce will be yummy. Yes, indeed they are yummy noodles. 

Fried Rice noodles : 
1 packet of rice noodles - persoaked with cool water until soft - drained & set aside 
200g fried fish cake, thinly sliced
4 cloves of garlic - minced
Thumb size ginger - thinly sliced
Vegetables of choice - I prefer cabbage / bak choi 
Dried enchovies - fried until golden brown with some oil & set aside. 
Thai fish sauce to taste. 

Preparation steps: 
1. Use the oil for from frying the enchovies. Heat up the oil & add in the garlic & ginger. Fry until fragrant the add the fish cake. Fry a little while. 
2. Add in the vegetables & fry until almost cook. Add in the noodle , add seasoning & mix well. Add some water, close the lid & let it simmer a few mins. Check if noodles is cook & fry a few more minutes to mix it well. 
3. Dish out & garnish with fried enchovies, spring onions & cut chili with light soya sauce / sambal. 

Bon appétit !

Chin's notes: 
1. Pre-fried some omelettes & sliced them thinly. Great for garnishing. 
2. Alternative sunny side up egg will be perfect too. 
3. I like to use the oil from frying the enchovies because the give the noodles more flavours. 


"Steamed" Lady Fingers

I love fast & easy meal without much cleaning after meal.

I baked the 2 dishes in a preheated oven at 180 degree C for 20mins. Voilà! My dinner is served within 1 hr including preparation time. :) 


1. Lady Fingers with Fried Garlic: 
One packet lady fingers - cleaned & cut the ends. 
One sheet of aluminum foil enough to wrap the lady fingers. 
1 tbsp water
Fried garlic for garnishing
Soya sauce
Preparation steps: 
1. Place the lady fingers in the middle of the foil & add 1 tbsp water. Wrap it up. 
2. Baked for 20mins. 
3. While baking the vegetables, minced some garlic & fry them in a pan with some oil until golden brown. Set aside. 
4. After 20 mins remove the lady fingers from oven. Garnish with light soya sauce, fried garlic & some oil from garlic before serving. 

2. Sambal Fish : 
Fish fillets - I used tilapia fillets 
Premix sambal paste - refer to picture above. 
Aluminum foil 
Preparation steps : 
1. Placed the fillet in the middle of the foil, add 2 tbsp of the sambal paste on the fish & wrap it up. 
2. Bake in a preheated oven at 180 degree C for 20 mins. 
3. Remove from oven & serve with rice. 

Bon appétit ! 

Chin's notes :
1. All baked in single session. At the end of 20 mins both meat & vegetable are ready to be served with rice. 
2. Cleaning was easy too. :) 
3. I will start to cook my rice when I start preheating the oven. 
4. Alternatively you can steam the lady fingers in the rice cooker while cooking the rice. Or steamed the fish on a steamer. 


Thursday, 8 January 2015

Baked chicken mid-wings


These are addictive!!! They are very easy to prepare with just a few ingredients. 

Baked Chicken Mid-Wings Recipe:

Ingredients :
20 pieces of chicken mid-wings - cleaned & pat dry. 
2 tbsp oyster sauce
2 tbsp soya sauce 
1/2 tsp pepper

Preparation Steps:
1. Marinate chicken in the above ingredients for 3 hrs or overnight in the fridge. 
2. Lay them neatly on the baking tray lined with aluminum foil / baking paper. 
3. Bake in preheated oven at 180 degree C for 20 minutes or untill fully cooked. 
4. Remove from oven. Serve as finger food or as a dish with steamed rice. 

Bon appétit !

Chin's notes:
1. Ensure chicken is at room temperature before bake. 
2. You can coat the chicken wings with some honey if you prefer them sweet, coat the wings after chicken are cooked, leave them in the oven for just a few mins before you remove them from the oven.
3. I like to pour the left over marinade on the wings before bake. 

4. My favourite oyster sauce. 

5. Cut the chicken in 3 sections. I normally throw away the tail end. But they are yummy if deep fried. 
Cut the wings into 3 sections. 


Chicken in Chinese Cooking Wine


A simple dish, chicken cooked in XiaoShing cooking wine (Chinese cooking wine) for today's dinner. 

Chicken in Chinese Cooking Wine Recipe

Ingredients : 
700g Chicken thigh cleaned, deboned & cut into bite sizes.
1 tbsp dark sweet soy sauce
3 clove garlic - smash 
2 tbsp vegetable oil 

Marinade: 
3 tbsp ShaoXing cooking wine 
1 tbsp oyster sauce 
1 tbsp soy sauce. 
Salt & pepper to taste 
1 thumb size ginger grated/chopped & juiced. 

Preparation steps : 
1. Marinate the chicken with the marinades for 30 minutes. 
2. Heat up the wok on high heat, add in the oil then garlic. Fry until fragrant then add in the marinated chicken.
3. Fry until chicken is partially cooked. Add in dark sweet soy sauce. Stir until the chicken is well coated for a few minutes. Cover with a lid turned the heat to medium & let the chicken smimmer until chicken is fully cooked. 
4. Dish out. Served with blanched broccoli & steamed rice. 

Bon appétit !! 

Chin's notes: 
1. There will be some gravy from the chicken. If more gravy is preferred, add some water & some soy sauce & adjust the taste accordily. 
2. These are also yummy to go with cooked egg noodles. 
3. Don't throw away the ginger after you taken the juice. Add them to the chicken as marinade. Best if they are fried with garlic before the chicken. 
4. Here is a picture of ShaoXing cooking wine. 


5. Alternatively HuaTiow Chinese cooking wine can used if ShaoXing is not available. 


Thursday, 18 December 2014

Satay Made Easy in the oven


Made satay for my son's school event - International Day. He wanted to tell his friends about the yummy food that Singapore has to offer... & I have to crack my head!! With the limited ingredients that I have with me, I "managed". Made 20 sticks for my classmates & teacher from French Class today. I think they love it!!

@12:30AM 19 Dec 2015, I just finished baking 100 sticks of satay (skewed in toothpick) for the International Day. 

Before bake: 

After baked & coated with peanuts sauce : 

Thanks to Esther Tho, who have shared with me a wonderful tip on the marinade for the chicken. 

Satay Chicken Recipe 
Satay peanut sauce
700g chicken thigh meat , cut into strips 

Marinade:
2 tbsp of curry powder
1 tbsp of turmeric power 
3 tbsp sugar - I used brown sugar 
Salt to taste 
2 tbsp of soya sauce 
2 lemon grass, smashed & cut thinly / chopped finely.
Bamboo sticks - soaked in water for 30minutes - I used toothpicks for mini size satay. 

Preparation method : 
1. In a bowl, mix the chicken meat with marinade ingredients. Mix well & set aside for at least 3 hrs or overnight is best. 
2. Skew the meat onto the skewer/bamboo sticks. Lined the baking tray with aluminum foil & lay chicken neatly on the baking tray. You may wish to oil on the foil with some oil to prevent the meat stuck on the foil after baked. 
3a. Bake in a preheated oven @ 180 degree C for 15 mins, take them out, coat each chicken meat with some peanut sauce. Pop them back into the oven for another 5 mins.
3b. Alternatively you can serve the peanut sauce separately in a bowl. If so, bake the chicken for 20mins at 180 degree C. 
4. Served with freshly cut cucumbers & red onions. 

Bon appétit !

Chin's notes : 
1. Coating of peanut sauce on meat is an option. You can served the peanut sauce separately.  
3. Cut the chicken meat in strips not too thick abit 1 - 1.5cm wide & about 0.8cm thick. 
4. Alternatively you can try with different kind of meat, pork, beef or mutton. 
5. These are lovely finger food to prepare for parties. 
6. Chucky peanut sauce are difficult to coat on meat, if you intend to coat peanut sauce on satay, I'll suggest to purée/blend the peanut sauce to get a creamy texture. Too late for these satay I'll try next time! ;)


Wednesday, 8 October 2014

Brussel Sprouts with dried shrimps


An easy to prepare dish Asian dish. 

Ingredients :
20g dried shrimps wash & dried
300g Brussels sprouts 
2 clove garlic - minced / thinly sliced
1" ginger - thinly sliced 
2 tbsp oyster sauce 
1 tbsp huatiow / shaoxing cooking wine
1/4 tsp of sugar
20ml of water
1 tbsp cooking oil

Methods :
1. Clean & cut each Brussels sprouts into 4 quarters.
2. Heat oil in wok, fry garlic & ginger until fragrant. 
3. Add in the dried shrimps & fry until fragrant, then add in the Brussels sprouts. Give a few good stir.
4. Add in the oyster & stir until oyster sauce is well coated on the veggies then add in some water & cooking wine. 
5. Put the lid onto the wok & let it cook for a few minutes. 
6. Sprinkle with some sugar & dish out.
7. Serve with steamed rice. 

Bon appétit !!