Showing posts with label cake. Show all posts

Thursday, 11 February 2016

Lemon Drizzle


I had 4 pieces of this cake at a Year 7, coffee morning. One of the mom ( Sofia ) brought this cake. Been thinking about it since I came back & I sent a request to her to ask for the recipe. She is very kind to share her recipe :) 

It is one of my favourite cake! It is moist & the amount of sugar made it a yummy cake! Parfait, with a cup of tea/coffee! 

Here is the recipe: 


Ingredients: 
225g butter 
225g sugar 
4 eggs 
4 tbsp milk
Zest from 2 lemons 
275g self raising flour + 2 tsp baking powder

Syrup: 
175g sugar 
Juice from 2 lemons

Bake in a preheat oven @ 160 degree C for 40mins for 8"x8" baking pan. 

Chin's notes: 
1. This cake has a lot of sugar, I tried to cut the amount of sugar & the cake turned sour. It needs the sugar to make it yummy! 
2. First, I creamed the butter & sugar. Then add eggs, milk, lemon zest & lastly the flour + baking powder. Just to combine all the infredients. 
3. Do not pour the lemon syrup immediately after baked.  Wait for the cake to be warm. Otherwise the syrup will be too wet at the bottom. 
4. Sofia's cake :p

Wednesday, 30 December 2015

Kuih Lapis


Buttery & eggy rich layer cake. One of my favourite cake. Usually bought them from the cake shop. It is an expensive cake because of the ingredients & the effort required to bake this cake.

I have been wanting to try to bake this cake for a long time. Took up the courage to bake one before the end of 2015. I halved the ingredients in recipe & reduced 100g of the sugar in A ( 50g ) & B (50g). 

Recipe from SHC: 

Chin's notes: 
My first layer was completely burnt in 2 mins. That was because my grill's default temperature is 300 degree C !!! 


Threw away & start all over again & changed the temperature to 220 degree C. Each layer takes about 3+ to get the nice browning on the top layer. 


Repeat these steps:
1. Spread the batter, thinly & evenly. 
2. Grill for 3 minutes or until each layer is nicely browned. 
3. Use a toothpick to remove the bubbles.
4. Flatten each layer with a cake presser. Gently pressed then cake. This will make your layers thinner. 
* Repeat step 1 - 4 until all the batter are used up. 


Monday, 14 December 2015

Pandan Chiffon


Pandan Chiffon's recipe shared by my youngest aunt. It is my daughter's favourite. According to her it is yummy!!! I baked for 55 minutes to get the slightly tanned edges. 

Video Tutorial for Earl Grey Chiffon: http://youtu.be/mHe7yolzhdI


Pandan Chiffon Recipe
Ingredients : 
Meringue :-
6 egg white
80g caster sugar
1/2 tsp cream of tartar

Yolk mixture :-
6 eggs yolk
100g caster sugar
100g plain flour
50g vegetable oil
50g coconut milk 
1 tbsp pandan extract

Methods :
1. Separate egg white and egg yolk into separate mixing bowl respectively.
2. Add cream of tartar and sugar into egg white, beat until egg white stiff.
3. Add sugar, oil and flour into the egg yolk mixing bowl.  Mix well.
4. Gently & slowly fold the meringue (stiff egg white) into egg yolk in 3 parts.
5. Transfer the mixture into chiffon baking pan and tap 3 times. Do not grease the pan.
6. Bake at 160 degree C preheated oven for 55 minutes.
7. Perform toothpick test. It should come out clean when cake is completely cooked.
8. Remove from oven, immediately tilt chiffon pan upside-down and leave to cool completely
9. Use a sharp knife to slice the edges to un-mould chiffon from pan.

Chin's notes:
1. You need to be calm when making this cake.  I tried many times, if I'm in a hurry it won't turned out nice. 
2. Make sure there is no traces of egg yolk in the egg white.  If egg yolk exist, the egg white won't turn stiff.
3. It is important to fold the meringue gently and slowly into the yolk mixture until all mixture are evenly mixed. 
4. If you prefer a lighter coloured chiffon, you can bake for 45mins or lesser.  Perform toothpick test to ensure cake is cooked. 
5. I don't have a solution for the cracked top yet. Mine always cracked! 
6. You can adjust the sugar to your taste, I have tried 80g on white & 80g on yolk. Still taste as good ;)

Bon appétit

Monday, 14 September 2015

Pandan Chiffon - 18cm Baking Pan

Bought some small chiffon pans from Malaysia last August.  Decided to give it a try using the same recipe from my youngest aunt with reduced sugar.  This is an ideal size for me to give away as gifts. :)

18cm Pandan Chiffons
Pandan Chiffon Recipe
Ingredients:
Meringue -
6 egg whites
80g caster sugar
1/2 tsp cream of tartar

Yolk mixture -
6 egg yolks
80g caster sugar
100g all purpose flour (sifted)
50g vegetable oil
50g coconut milk
1 tbsp pandan essence/extract

Preparation steps:
1. Separate the egg whites from the egg yolks into separate bowls respectively.
2. Add cream of tartar to the egg white, whisk until you see some bubbles forming add the sugar.  Whisk until egg white is stiff peak. Set aside.
3. In the egg yolk bowl, add sugar, coconut milk, vegetable oil, pandan extract and mix well. Add in the flour, stir well until a smooth batter is achieved.
4. Transfer the meringue into the yolk batter, gently and slowly fold the meringue into the yolk batter. Once it is evenly mixed. Transfer mixture to a chiffon pan,  I halved the mixture and transferred to 2 chiffon pans (18cm). Note: do not grease the chiffon pan.
5. Drop the chiffon pan on the table a few times to remove trapped air bubbles.
6. Bake in a preheated oven at 160 degree C for 55 minutes.
7. Perform toothpick test, it should come out clean when the cake is completely cooked.
8. Remove from oven, immediately tilt the chiffon pan upside down and leave to cool completely.
9. Use a sharp knife to slice the edges to un-mould cake from pan.

Bon appétit !

Just out from the oven.

Upside down for cooling


Chin's note:
1. Ensure that there is no traces of egg yolk in the egg whites.  If there are traces of egg yolks the egg white will not be stiff peak.

Tuesday, 8 September 2015

Banana Chocolate Cupcakes

I always wonder if a cake's recipe will turns out okay as cupcakes.  This time I tried with banana chocolate sheet cake recipe with a small change in the recipe. I used 180ml warm milk instead of ( 120ml warm water + 60ml milk ). They turned out moist & yummy. Just like the initial recipe maybe richer in calcium? :P

Chocolate ganache with walnuts.

Filled the cupcake liners to about 80 / 85 % full. 

After 20mins in the oven.

Chin's notes:
1. Baked for 20 mins at 180 degree C, it may requires more / lesser time depending on your oven.
2. Recipe from Bear Naked Food & here is the link to the recipe.
3. My first attempt for this recipe: Banana Chocolate Cake

Tuesday, 1 September 2015

Banana Chocolate Cake

Joining in the craze to bake this cake. I just finished baking & garnished this cake. An easy recipe! 


Recipe from Bear Naked Food & here is the link to the recipe. 


I find that the my cake was too thin & it does not have the volume, so I decided to halve my square cake & spread a layer of chocolate ganache on one & stack the other on top. Coat it with chocolate ganache & added the finishing touches! 

Voilà ! 

The texture of cake is moist & soft, Yummy!!!

Chin's notes: 
1. Baked using 10"x10" square baking tin. Will try a smaller baking pan.
2. The origin of the recipe:
3. I find that the sweetness is just nice. I used Lindt 70% cocoa chocolate is slightly on the bitter side. Hence the the bitter ganache actually compliments the sweetness. It was suggested in the recipe to use 70% cocoa chocolate. 
If sweet chocolate were used. Then I think it will be overly too sweet.

Monday, 27 July 2015

Light Butter Cake

I love butter cake & today there is a craving for butter cake & decided to try a new recipe with my 8"x8" pan.  A recipe from Rasa Malaysia.  It turned quite good, light & not too oily with buttery taste. Yum!


And I have always wanted to make lines prints on my cake top.  Finally there is a reason to try it.  It was really easy, lightly rub cold butter on the cooling rack, carefully, place the cake top resting on the cooling rack. Let it cool completely before flipping over. Place a plate at the cake bottom & flip it gently. Voilà! The lines were printed on my cake!! 

Bon appétit !! 

Here is the link to the recipe:

Chin's notes:
1. I used buttermilk instead of fresh milk / yoghurt. 
2. To make butter milk - 4tbsp of fresh milk + 1 tbsp of lemon juice, give a gentle stir & set aside for 10 minutes. 
3. For the lines print, need to rub butter on the cooling rack so the cake won't stick to the cooling rack. 

Thursday, 28 May 2015

Cherry Almond Loaf

Cherries are in season. My friend, Sarah shared her lovely Cherry Almond Loaf recipe. It was a long bake, about 1 hour but worth it all. My eldest son, finished 1/3 of the loaf.... :p


The process... 

After 1 hr of baking.

Here is the link to the recipe: 
Chin's notes:
1. Cupcakes in the next bake. 
2. Added almond flakes to the loaf.

Saturday, 16 May 2015

Pandan Chiffon - Cooked Dough Method

I have always baked my chiffon using the "usual" method.  Jenny Lim shared an interesting recipe & I just have to give it a try.  The texture is much softer compared to the usual method's chiffon. This recipe is a keeper. :)


The recipe asked for pandan juice , I used pandan extract & replaced the water with more coconut milk. I used plain flour instead of cake flour.

Oh.. This recipe do not ask for cream of tartar & baking powder. ;)

The processes happened very fast, I did not have enough time to preheat my oven. My batter was waiting (at least 3 mins) for my oven to be ready. 
NB: Make sure you start your oven before you prepare the batter. 


Pandan Chiffon adapted from Wen's Delight

Ingredients: 
5 egg whites 
80g sugar

5 egg yolks 
100g coconut milk 
1 tbsp pandan extract 
50g butter
90g plain flour 

Preparation steps: 
1. Whisk ingredients A until stiff peak. 
2. In a pot (heavy based is preferred), put in the coconut milk, butter & pandan extract. Over the stove, heat up the pot until the butter melted, turn off the heat. 
3. Fold in the flour quickly, until well mixed. Then add in the egg yolks & mix well. 
4. Gently fold 1/3 of the egg white into warm batter (B). Then the mixed mixture into the remaining egg white. Fold evenly until well mixed. 
5. Transfer batter into the chiffon baking pan. Drop the baking pan gently on the table to release trapped air. About 3 times. 
6. Bake in a preheated oven at 170 degree C for 10 mins then continue to bake at 150 degree C for 35 mins. 
7. Test the cake if fully cooked with a toothpick / cake tester.
8. Invert baked cake immediately for cooling. 
9. Use a kitchen knife to unmould the cake when cake is completely cooled.

After baked.

Invert to let the cake cool.


Chin's notes: 
1. Here is the original recipe shared. 
2. Remember to start preheating your oven before you start preparing your batter. The steps by steps process is so fast. 
3. Do no grease the cake pan, the batter needs the "wall" to "climb". 
4. There is no cream of tartar & baking powder used in this recipe. 

Monday, 4 May 2015

Pandan Kaya Cake

I have a mission to make this cake for a special celebration in Paris.  I have never baked this cake before & I'm determine to give it try with the following recipe from Kitchen Tigress. 


My first attempt & I made some minor adjustment to the recipe because I do not have some of the ingredients & they turned out great! At least they taste yummy to the family ( my tasters ;) !! & the sweetness is just right! :p

This is a cake with a layer of "jelly" / custard garnishing with coconut flavour.

Pandan Kaya Cake adapted from Kitchen Tigress

For the cake recipe : 
Ingredients - 
4 egg whites ( from medium size eggs) 
40g sugar 
1/2 tsp cream of tartar 
B
10g sugar 
3 egg yolks ( from medium size eggs ) 
50g corn oil / vegetable oil
45g coconut milk
1/2 tsp baking powder 
50g plain flour - sifted 
1 tbsp pandan extract

Preparation steps:
1. Line the baking tray with baking paper. 
2. Put all the A ingredients into the mixing bowl & whisk until the egg whites stif peak. 
3. In a separate bowl, mix all the B ingredients until they are well combined. 
4. Gently fold A into B in 3 portions until they are well combined. Do not over fold.
5. Transfer mixture into a lined baking tray & bake in a preheated oven at 160 degree C for 40 minutes or until the cake is cooked. Test with toothpick, they should come out clean when cake is cooked. Meanwhile, prepare the kaya / jam while waiting for the cake. 
6. When the cake is ready, remove from oven & leave the cake to cool on a cooling rack. 

For the kaya ( jam ) recipe
Ingredients -
C
340g of water + 1 tsp pandan extract
1/2 tsp of white agar agar powder
40g sugar 
25g of butter (I used salted butter) 
A pinch of salt (very little to bring the flavour out)
D
120g coconut milk
35g corn flour 
1/2 tsp pandan extract 
Few drops of yellow colouring ( or more to get the desire green colour) 
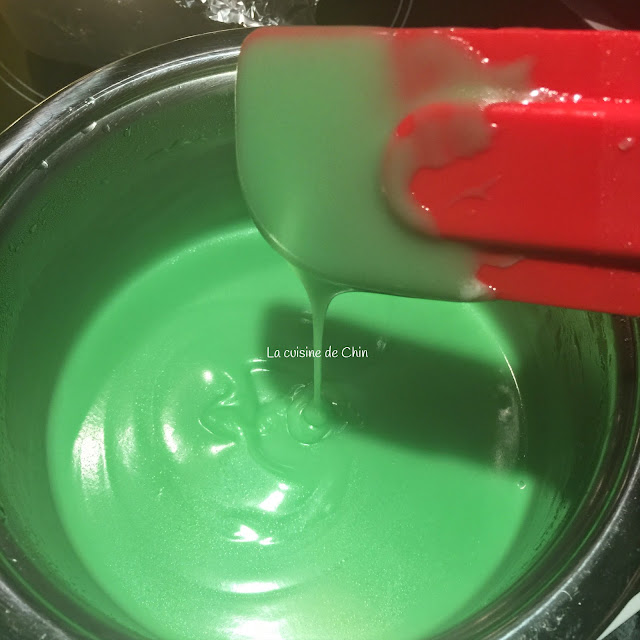
Kaya / Jam 

Preparation steps : 
1. While the cake is in the oven baking. Mix all the C ingredients into a cooking pot (thick/heavy base pot is preferred). Stir until all the sugar dissolved. Set aside for 30 mins / more. 
2. In a separate bowl, mix all the D ingredients until they are well combined. 
3. Only start to cook the kaya / jam only when the cake is competely cooled! 
4. Heat up the pot with C mixture on a medium heat. Do not bring to boil. Just warm enough to melt the butter.  Once the butter has melted. Turn off the heat & remove from heat. 
5. Stir in D mixture into C, once is well combined, turn on the heat to low - medium heat & cook the mixture until it is smooth & thicken. Stir constantly. Add more drops of yellow colouring if the mixture is too green. Add yellow colouring until the desire colour is achieved. 
6. Once mixture is thicken (when they coat the side of the pot). Turn off the heat & set aside to cool down a little. Just a few minutes.

To assemble the cake: 
Cake assemble process
1. You'll need a container / pan to put  the cake & kaya together. I lined the container/pan with aluminum foil. 
2. Cut the cake into the desire shape. I just halved my square cake to get 2 rectangle cakes. 
3. Place the bottom layer cake in the prepared container / pan. Then pour the kaya over the cake. Slowly swirl to get a layer of kaya coated evenly on the cake. 
4. Then wait for the kaya to set a little. I put into the fridge for 1 min to let the kaya set. 
5. Place the other half of the cake on the kaya. With the top facing the kaya, so I will get an even top for the finished cake. Then pour the kaya over the cake, swirl to get a smooth & even top.
6. Leave it in the fridge until the kaya is completely set. I left it overnight in the fridge. 
7. When the kaya is set, unmould & trim off the edges. Cut the cake into serving bite sizes & serve them cold. 

Trim off the sides

Voilà & bon appétit! 

Chin's notes
1. Here is the link to the original recipe: 
http://kitchentigress.blogspot.sg/2014/06/pandan-kaya-cake-video-recipe.html?m=1
2. The ingredients were quite small, I'll double them in my next bake! Only managed to get 2 layers of cake instead of 3. My final cake is about 5.5"x8.5" cake.
3. Take note of the sequence in the preparation. 
4. Kaya consistency can be tricky. I cooked until I can see the obvious stirring trails when I stir the mixture. 

Wednesday, 22 April 2015

Baileys Buttercream Icing


My first attempt in making buttercream & decided to give a little twist. Added Baileys, just enough for the alcohol to lingers in the mouth. 

Great for dressing up any chocolate/coffee cake & have the cake with a cup of coffee / tea! 

Baileys Buttercrram Icing Recipe 
Ingredients : 
250g soft butter at room temperature
250g icing sugar sifted
4 tbsp baileys

Preparation steps : 
1. Cream butter until light & fluffy in an electric mixer. 
2. Add the icing sugar & baileys, give it a bit of stir with a spatula before you start the machine to prevent the icing sugar flying all over. 
3. Cream until light & fluffy. 
Voilà!

Simple Chocolate Cake

Someone shared this recipe of the cooking forum today & I decided to give it a try & a chance to practice my piping skills. Not quite there yet!


Made a slight change to the icing. Added 4 tbsp of Baileys ( :P ) instead of 2 tsp pure vanilla extract. At least can taste the Baileys.

Made some small cupcakes & a 26cm diameter cake. I think my baking pans were a bit too big, didn't get the cake volume intended.   23cm would be better. 


Here is the video link to the recipe  from Joyofbaking.com

Baileys Buttercream Icing: 
Ingredients: 
250g soft butter at room temperature
250g icing sugar
4 tbsp Baileys  

Preparation steps: 
1. Cream butter until creamy with an electric mixer. 
2. Add the icing sugar & Baileys. 
3. Cream until light & fluffy. 

Voilà ! 


Sunday, 29 March 2015

Red Velvet Mini Cupcakes

Tried this recipe from www.taste.com.au
The recipe, made delicious cake. It is moist & the icing is yum with a touch of raspberry.

I did not know some bakes uses white vinegar. Apparently it helps to make the bakes lighter. Link below explains why: 


Chin's notes: 
1. Baked in a preheated oven at 180degree C for 15 mins. 
2. Reduced sugar to 300g the cake & 160g icing sugar for the icing. 
3. I should have left the butter out instead of warming them in the microwave. Left it a bit too long, it became watery. They are still yum, love the cream cheese taste. I should have left the butter out instead of warming them in the microwave. Left it a bit too long, it became watery. They are still yum, love the cream cheese taste. 

Tuesday, 10 March 2015

Victorian Sponge Cake

Just finished baking & decorating a Victorian Sponge Cake for Victorian Day tea party at my son's ( Year 6 ) school tomorrow.  Learning history with a bit of fun.


Baked 2 round sponge cakes, spread the bottom cake with strawberry jam, laid some strawberry slices. Then spread the whipped cream & put the top cake on the bottom cake. 


Spread strawberry jam & strawberry slices on bottom layer of the cake


Then spread a layer of whipped cream

Finaly decorated the cake with whipped cream, strawberries & sprinkled with icing sugar.

Recipes from allrecipes.co.uk link below.  I used whipped cream instead of butter cream.


Thursday, 5 February 2015

Banana muffin in a cake pan

Thank you, Jenny Lim for her wonderful idea of baking the banana muffin in the cake pan.

Baked at 180 degree C for 35 minutes.

Before bake.

I decorated with banana slices & mini skittles. Oops it is not skittles should be smarties. ;) This bake is for the Year 6 moms' coffee morning on Friday 6th Feb 2015. 

Banana Muffin Recipe :

Chin's notes:
1. For this cake pan, I baked in the preheated oven at 180 degree for 35mins. 

Thursday, 13 November 2014

A special birthday cake

Tried to bake a birthday cake for someone special. A simple recipe yet so yummy!!! 


Topo Map Cake recipe shared by Singapore Home Cooks (SHC) group: 
http://wendyinkk.blogspot.sg/2012/05/topo-map-love-cake-kek-alunan-kasih.html?utm_source=BP_recent

Chin's notes: 
I made a smaller cake by halving the ingredients & replaced evaporated milk with 50ml fresh milk. Decorated the cake with sugar glacé & M&Ms. 

Ingredients used for this cake. 
125g butter 
125g sugar 
150g flour
1 tsp baking powder 
1 tsp vanilla essence 
1 tsp pandan extract 
50ml fresh milk. 
Cocoa powder 


My final birthday cake with love..


Tuesday, 28 October 2014

Easy Vanilla Cupcakes

Vanilla Cupcakes with Sugar Glacé & Fondant

All time favourite, vanilla cupcakes. Playing with sugar glacé & fondant, got the cute rose idea from the web & wanted to try it out. It was not that difficult to make.

Video tutorial for vanilla cupcakes:

Vanilla Cupcakes
Easy Vanilla Cupcakes Recipe :

Make 12 cupcakes. 

Ingredients :
115g self raising flour 
115g sugar 
115g butter at rm temperature 
2 eggs
1 tsp vanilla essence

Method :
1. Cream butter & sugar, then adds eggs & vanilla & finally flour. 
2. Line the baking tray with cupcake liners. 
3. Fill each liner 2/3 full with batter. 
4. Baked in preheated oven at 180C for 15 - 20 mins. 
5. Perform the toothpick test. It should come out clean when cake is cooked. 
6. Let it cool completely before you add decoration on the cupcakes. 

Bon appétit !! 

Chin's notes: 
1. Can sprinkle chocolate & nuts toppings on the batter & bake. 
2. If you do not like vanilla, you can remove the vanilla, then it will be come a butter cake.
3. Other decorating ideas your cupcakes.

Video tutorial for sugar glacé:

Sugar Glacé with M&Ms

Decorated with Fondant


Friday, 24 October 2014

Japanese Cottony Cheesecake

I yet to master this recipe.. My first attempt. Baked 2 cakes in a single session.  One successful looking cake but the other not so slightly....

Here is the recipe, there are many people who tried this recipe successfully!! I'm determine one day I can bake beautiful Japanese cottony cheesecake! 😉


Sunday, 12 October 2014

Zebra Cake Finally!!!


Finally after a few failed attempts to get the zebra prints on my cake.  The lines are more visible. This time round I just used a normal butter cake recipe with added buttermilk & cocoa powder.

If you are using non stick pan. I'll suggest you line with a piece of baking paper, to prevent the batter from spreading too fast. I think this could be the reason that caused my failure previously. 


Alternate the batter to get the prints : 

Alternating batter to fill up the baking pan

Here is the basic butter cake recipe : 

8" baking pan. 

Ingredients :
5 eggs 
250g butter 
250g self raising flour
250g sugar 
1 tsp vanilla extract / essence 
60ml buttermilk
20g cocoa powder 

Methods : 

1. Prepare buttermilk : 60ml of fresh milk & 1 tbsp of lemon juice. Leave for 10 minutes. Make this before you start measuring the ingredients for the cake. 
2. Cream butter & sugar until creamy.
3. Add egg one at a time into batter. Mix well. 
4. Add in the vanilla essence then add in buttermilk to the batter. 
5. Divide the batter equally into 2 portions  into 2 mixing bowls.
6. Add cocoa powder to one of the batter, mix well. 
7. Grease & line the baking pan. I only add a piece of baking paper on my non-stick pan. 
8. Spoon 1 tbsp plain batter in the middle of the pan, then add 1 tbsp of cocoa batter onto the plain batter. Keep alternating both batters until you finished both batters. 
9. Bake in a preheated oven at 175 degree C for 45mins or until cooked. Perform the toothpick test, toothpick should come out clean when cake is fully cooked. 
10. Leave on the cooling rack to cool. 

Chin's notes :
1. You can also make these into cupcakes. Baked in preheated oven at 180 degrees C for 20 mins or until cook. 
2. If you like coffee, you can add a sachet of instant coffee mix to the cocoa batter. 
3. Previously failed to get the visible prints with a different recipe. Here is a link Owl cake ?

Bon appétit !


Made 6 cupcakes with the same batter
Same concept, alternate the batter to fill up the liners