Sunday, 31 May 2015

Wrapping Rice Dumplings (包粽子)

Rice Dumplings

One of my favourite snacks. Usually I will buy them from the market or at the mall.  The most difficult part is not the ingredients, it is the way it was wrap & how to get all the nice corners & the dumpling has a nice solid shape!!
I have always wanted to learn how to wrap them & decided to take up the challenge a few days ago. I have been gathering information on how to wrap the rice dumplings. 

I found this video (the link below) very informative because she showed you how to get the nice corners. 

This is my first attempt & I don't want to use expensive ingredients. For this practice session I used glutinous rice, some beans & peanuts soaked overnight then fried with salt & coconut milk. Only made 7 rice dumplings. 

Ta-da!!! My first rice dumpling. :)
A bit skinny, need to get a fuller dumpling next time.


How they were made...

1. Soaked the dried bamboo leaves. Cut away the hard stems from the bamboo leaves. 
Trim of the hard stems they will get in the way during wrapping.

2. With the top side of the bamboo leaves facing you, make a cone & fill up with rice. 
Fill it up with the rice and pressed to firm up the rice mixture.

3. Fold the top flap flat onto the rice filling & press the 2 corners & adjust accordingly until you get a nice pointy corners ( refer to video). Then get the other corner & fold it neatly & tug away the leaves to the side. 
Side View: Fold the top flap down and adjust the 2 corners.

Top View: Need to get into this shape where the top flap were folded onto the rice.

4. Secure the rice dumplings with strings. 
It takes a while to get the hang of it.. Took me a while to secure ONE.

5. Boil for 1.5hr with dumplings completely submerged into water then hung to dry & cool. 
They are heavy after cooked.

6. There were one or two dumplings with exposed rice but all my rice dumplings were still intact! Overall I think it was quite a successful challenge!!! :) 

Oops! An exposed rice dumplings!
Bon courage!!!

Chin's notes: 
1. Use the top side of the leave instead of the bottom. When the rice are cooked, they will not stick to the leaves. 
2. I find that it is easy to wrap if the glutinous rice is slightly cooked compared to raw glutinous rice.
3. I practiced with raw glutinous rice, a bit too loose. It is more difficult to manage the corners as well. 


Friday, 29 May 2015

Chicken Parcels ( 纸包鸡)


This a favourite family dish ( chi pao kai in Cantonese) with some juicy gravy. I have been busy with other recipes & totally forgot about this easy & yummy dish! 

Made some for dinner today... :p


This parcel was my first chicken parcel wrapped in August 2014. 


Chicken Parcels Recipe
Ingredients:
8 chicken thigh - cleaned, I removed the skin & keep the bone intact. 
3 stalks spring onions - cut about 3cm length.
4 baking paper / greaseproof paper - big enough to hold 2 chicken thighs. 

Marinade:
3 tbsp oyster sauce / mushroom sauce
1 tbsp light soya sauce 
1 tsp sugar 
1 tsp sesame oil 
2 tbsp Chinese cooking wine ( shaoxing/huatiow)
Pepper & salt to taste
4 clove of garlic - minced
Thumb size ginger - minced 

Preparation steps:
1. Clean chicken & leave in the big bowl. Add in the marinade & mix well. Marinate for at least 1 hour. Best if leave overnight.
2. Prepare the paper & put 2 pieces of chicken thighs & garnish with spring onions. 
3. Wrap it up & seal it. 
4. Repeat until all the parcels are done. 
5. Bake in a preheated oven at 180 degree C for 20 minutes. 
6. Remove from oven & served immediately with steamed cooked rice! 

Bon appétit !! 

Chin's Notes:
1. Great to make for individual serving / one big parcels. For big parcel, best to use double layer of the baking paper. 
2. I just used normal baking papers. 
3. I did not remove the bone because more effort is required. I like to keep it simple. But will remove the skin ;) 
4. For sealing I will tie it up / seal it with a stainless steel pin. 

5. Alternatively you can also wrap it like below. ;) as long as the chicken is sealed properly! 

Thursday, 28 May 2015

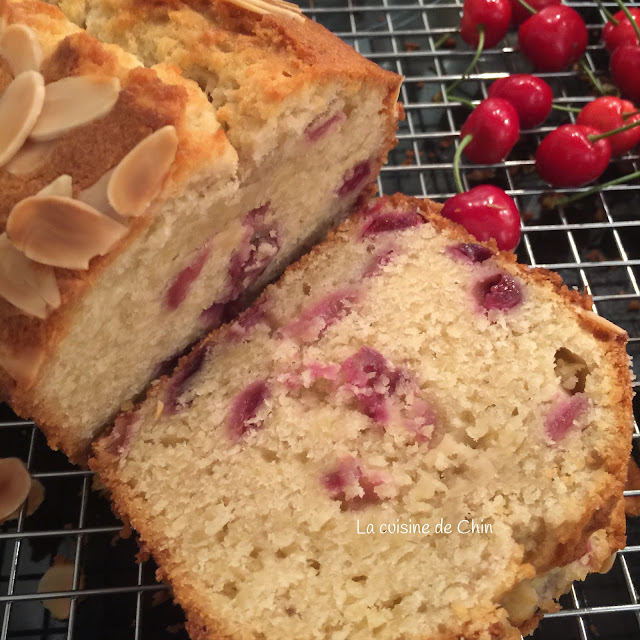
Cherry Almond Loaf

Cherries are in season. My friend, Sarah shared her lovely Cherry Almond Loaf recipe. It was a long bake, about 1 hour but worth it all. My eldest son, finished 1/3 of the loaf.... :p


The process... 

After 1 hr of baking.

Here is the link to the recipe: 
Chin's notes:
1. Cupcakes in the next bake. 
2. Added almond flakes to the loaf.

Monday, 25 May 2015

Different types of flour

Came across the following site which explains the different types of flour & it's purpose. 

Hope you'll find them useful too... :) 

Cucur Bawang


Can't remember when was the last time I had these until Alice Pang shared her mummy's recipe at the cooking forum - Thank you!! 

I love these fried onion & vegetables snacks. They are yummy with your favourite chili sauce.  I will add prawns if I have them but I ran out of prawns. 

Add the vegetables to the batter & mix well.


I made 2 different flavours, plain & with curry powder. 

Curried (darker in colour) & Plain (lighter in colour). 


Cucur Bawang / Fried Onoins - Adapted from her recipe:

Ingredients 
170g flour
30g corn flour
2 eggs 
100 ml water 
1 tbsp curry powder ( optional )
1/2 tsp salt ( or to taste) 
1/2 tsp pepper ( or to taste)

1 big onions - thinly sliced 
1 carrot - thinly sliced 
1 stick of celery - thinly sliced 
4 leaves of cabbage - thinly sliced 
Chili powder for garnishing ( optional ) 

Preparation steps :
1. In a big mixing bowl. Add the flour make a well, then add the eggs & water slowly stir the flour from the center to get a consistent batter. Add in the salt & pepper & curry powder. Mix well. 
2. Add in all the vegetable & prawns & mix well. 
3. Heat up the oil in the wok for deep frying. 
4. Take a spoon full of mixture & place into the hot oil. Deep fry until golden brown. 
5. Garnish with chili powder.
6. Yummy to eat with your favourite chili sauce! 

Bon appétit !

Chin's notes:
1. Can add your choice of vegetable & fresh chili but onion is a must! :) 

Saturday, 23 May 2015

Honey Cornflakes


Baked them for snacks. These are easy to bake &  very yummy!  

Recipe from Noobcook.com 

150g cornflakes - I did not crushed
50g butter - I used salted butter
2 tbsp honey

Preparation steps 
1. Melt butter in a pan/wok on low heat, do not bring to boil. Once butter is melted , turned off the heat & add honey. Mix well. 
2. Pour in the cornflakes. Stir & coat the cornflakes with the melted butter & honey until all the cornflakes are well coated. 
3. Fill up the baking tray lined with baking liners. Add garnishing like thousands & thousands. 
4. Baked in a preheated oven at 150 degree C for 10mins or until golden brown. Remove & let them cool on the wire rack. 

Voilà! 

Chin's notes:
1. Store in the air tight containers & served when needed. 


Friday, 22 May 2015

Salsa with Tortillas Wrap


A new favourite for my eldest son & I. So easy to make & taste is superb!! 
Anna Tan shared her recipe & I just use what is available in my fridge. Here is my version. 

Ingredients at a glance.

Put all the cut up ingredients in a large bowl.


Mixed well.

Salsa
Ingredients 
2 large tomatoes - I used combination of tomatoes to get the different colours.
I used 2 shallots - thinly sliced & diced
1 glove garlic - finely minced
English parsley / coriander / sweet basil leaves - thinly sliced
1 tbsp olive oil 
Juice from 1/2 lemon / lime
Black pepper & sea salt to taste 
Red pepper ( optional , I did not use because my son does not like peppers) 

Preparation steps: 
1. Diced tomatoes & the rest of the ingredients. Put them in a big bowl.
2. Add the seasoning & mix well. 
3. Chilled before serving.
4. Serve with corn chips / Doritos / tortillas wrap. 

Bon appétit ! 

Chin's notes: 
1. An easy lunch meal or as salad. 
2. I have tried with coriander or with sweet basil leaves. Very tasty! 
3. If you like black olives, they goes very well too with the tomatoes.